
Author: Suyash Jadhav
Introduction
There are many powerful tools you can use in conjunction with Snowflake, but today let’s explore the powerful tool in dbt, Snapshots, and how to implement it in Snowflake.
Slowly Changing Dimensions: Type 2
Slowly Changing Dimensions (SCDs) play a vital role in preserving historical information while accommodating updates and changes. It refers to the dimensions within a warehouse that changes slowly over time. SCD Type 2 provides a mechanism to capture and store historical changes, enabling analytical queries to accurately reflect the state of dimensions at any given time. SCD Type 2 provides a mechanism to capture and store historical changes, enabling analytical queries to accurately reflect the state of dimensions at any given time.
dbt Snapshots
- One of the effective ways to implement SCDs is by leveraging Dbt Snapshots, a powerful feature of Dbt. Dbt Snapshots records change to a mutable table over time.
- Dbt Snapshots implement Slowly Changing Dimensions Type 2 over mutable source tables.
- When you run the dbt snapshot the first time, it will create the snapshot table with the columns you mentioned in the select statement and the table includes the additional columns named dbt_valid_from and dbt_valid_to. So on the subsequent runs, both columns are updated as per the changes made in the table.
Configurations in dbt Snapshot
- You can add configurations to your snapshot using the config block. In the config block, you can customize the behavior and settings of the snapshot. It provides a way to define parameters and options specific to the snapshot model.
- The configurations that are available for the snapshot are :
- Target_database – It allows you to specify the database where the snapshot table will be created.
- Target_schema – It enables you to specify the schema in the database where the snapshot table will be created
- Unique_key – It enables you to specify the additional columns in the snapshot table that should have a unique constraint. This ensures that the records in the snapshot table are uniquely identified based on the combination of these columns
- Strategy – It specifies how to identify the changes between snapshots. The available strategies are :
- Check – This strategy compares the list of columns between their current and historical values. It requires check_cols configuration in which we need to specify the columns to check for changes or you can also mention it as “all” to check all columns
- Timestamp – It requires updated_at configuration also it will use it as a field in the table to determine if a row has changed. The updated_at column represents when the source row was last updated
Implementing dbt Snapshots in Snowflake
Dbt Snapshots in Snowflake allow you to capture and manage point-in-time views of your data as it progresses through your data pipeline. This feature enables you to preserve historical information while performing incremental updates to your curated layer.
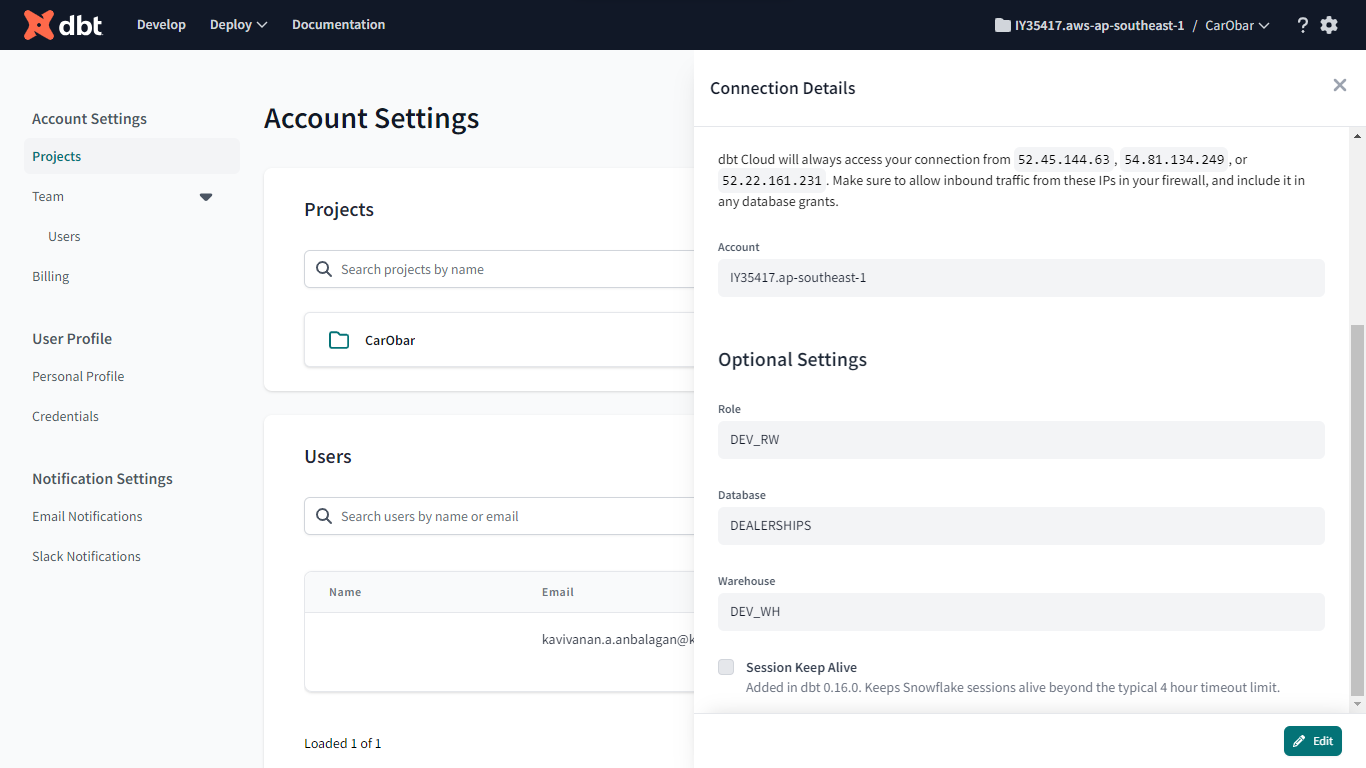
Step 1: Configure the dbt Project in the dbt cloud
- Start by setting up a dbt project and configuring it to connect to your Snowflake account. Provide the necessary credentials and connection details.
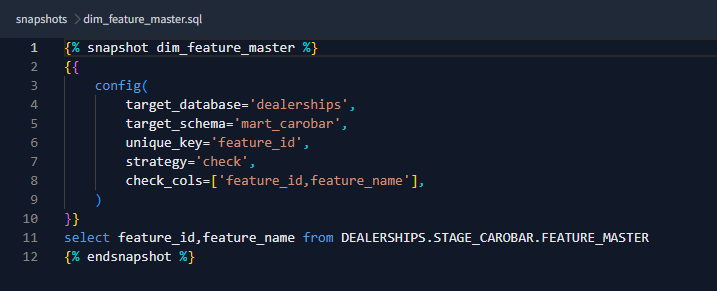
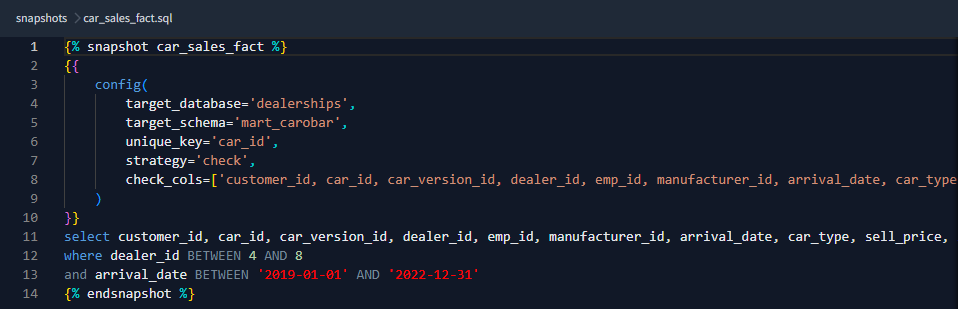
Step 2: Create a Snapshot Model
- Create a snapshot model for a mutable data source. Here we created a snapshot model for each table in the raw layer to keep track of all the changes happening over time. The snapshot model is created within the snapshot folder. Make sure you mention the file extension in the file name.

Step 3: Define the Config
- For each snapshot, define the config as per the project requirement. Here we have defined the config as per our project requirements like the corresponding target_database, target_schema, unique_key, and strategy. As we are loading the data from the raw layer to the curated layer, we have mentioned the target_database and target_schema as per the curated layer, and in the SELECT statement, we have mentioned the database and schema in the raw layer in Snowflake.
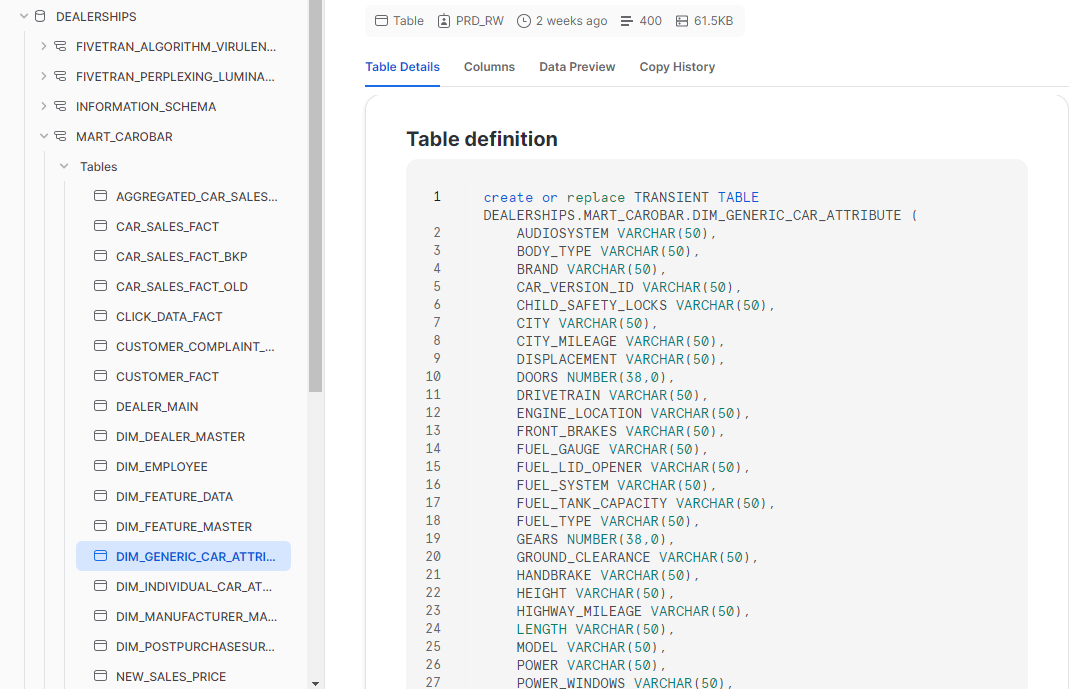
Step 4: Running the Snapshot Models
- Once the snapshot model is created, you can run it using dbt snapshot so that it will create a snapshot table. In our case, as you can see below when we run the dbt snapshot, all the snapshot tables are created in the curated layer in Snowflake which is the target_database and target_schema we mentioned in the config.
- Also in dbt, if you want to run any specific snapshot model or any model you can mention that specific model name like “dbt snapshot –select <model_name>” and you can run that model separately instead of running all the models again using the “dbt snapshot” command.
Step 5: Schedule a Job
- You can configure dbt to run on a scheduled basis, ensuring that your curated layer is kept up-to-date. This can be achieved using dbt cloud, a scheduler, or custom orchestration tools. In dbt, you can create a Job and run it on a scheduled basis.
Conclusion
Implementing dbt Snapshots in Snowflake provides a robust solution for managing data. By following the step-by-step process outlined above, you can leverage the power of dbt and Snowflake to maintain historical views of your data.


